Learn how to build and configure a web application that can verify mDocs
Introduction
In this tutorial, you will use the MATTR Portal and the Verifier Web SDK to build and configure a web application that can verify an mDoc presented via an online presentation workflow as per ISO/IEC 18013-7:2025 and OID4VP.
This web application will support both same-device and cross-device workflows to accommodate flexible user journeys.

- The user interacts with your web application on their mobile device browser.
- The user is asked to present information as part of the interaction.
- The user is redirected to their wallet application.
- The user is informed of what information they are about to share and provide their consent.
- The wallet application authenticates the user and shares the information with the verifier.
- The user is redirected back to the web application where verification results are displayed, enabling them to continue with the interaction.
The result will look something like this:

- The user interacts with your web application on their desktop browser.
- The user is asked to present information as part of the interaction.
- The user scans a QR code using a mobile device with an installed wallet application.
- The wallet application is launched on the mobile device.
- The user is informed of what information they are about to share and provide their consent.
- The wallet application authenticates the user and shares the information with the verifier.
- Verification results are displayed in the user's desktop browser, enabling them to continue with the interaction.
The result will look something like this:
Prerequisites
Before you get started, let's make sure you have everything you need.
Prior knowledge
- We recommend you make yourself familiar with the following concepts to support your understanding
of the concepts included in this tutorial:
- What is Credential verification?
- What are mDocs?
- What steps does an online verification workflow comprise?
Assets
- Complete the sign up form to get trial access to MATTR VII and the MATTR Portal.
- Use the MATTR Portal to create a new tenant.
- Install the MATTR GO Hold example app by following the getting started guide and use it to claim an mDoc.
- Refer to the completed implementation in our Sample Apps repository to compare with your progress at any time.
Development environment
- Download and install npm.
- To test locally you will need to expose your web application to the internet. You can do this by setting up a free ngrok account, using a cloudflare tunnel or using your own solution. For this tutorial we will be using ngrok. Sign up for a free account at ngrok.com.
- You will need a code editor such as VS Code.
Got everything? Let's get going!
Overview
The following diagram depicts the workflow you will build in this tutorial:
- The user triggers the workflow by interacting with the web application.
- The customer's backend creates a unique challenge and passes it to the customer's web application.
- The web application passes the unique challenge with the request to start a presentation session.
- MATTR VII interacts with the user's wallet application to complete the verification workflow.
- The web application is notified when the MATTR VII tenant has completed verification.
- The web application passes the session ID to the backend.
- The backend makes a request to MATTR VII to retrieve the verification results for that session.
- The MATTR VII tenant responds with the verification result and the unique challenge.
- The backend compares the original and the received challenge to ensure the response can be trusted.
- The backend passes the verification results to the web application.
You will build this workflow in three parts:
- Part 1: Use the MATTR Portal to configure the MATTR VII verifier tenant.
- Part 2: Build a web application with mDocs verification capabilities.
- Part 3: Integrate a backend.
Part 1: Configure the MATTR VII verifier tenant
The MATTR VII verifier tenant will be used to interact with your web application (generating a verification request) and the wallet application (presenting an mDoc for verification) as per OID4VP and ISO/IEC 18013-7. To enable this, you must:
- Create a verifier application configuration: Define what applications can create verification sessions with the MATTR VII tenant, and how to handle these requests.
- Create a supported wallet configuration: Define how to invoke specific wallet applications as part of an online verification workflow.
- Configure a trusted issuer: The MATTR VII verifier tenant will only accept mDocs issued by these trusted issuers.
You can perform these steps via the Portal or by making API requests to your MATTR VII tenant.
Create a verifier application configuration
Each MATTR VII tenant can interact with multiple verifier applications, and can handle requests differently for each application. This means you must create a verifier application configuration that defines how to handle verification requests from your web application.
- Expand the Credential Verification section in the left-hand navigation panel.
- Select Applications.
- Select the Create new button.
- Use the Name text box to insert a meaningful and friendly name for your application.
- Use the Type radio button to select Web.
- Use the Allowed domains text box to insert a placeholder domain name (e.g.
place-holder.com). This indicates domain names that the MATTR VII tenant can verify incoming requests are from known and trusted applications. You will update this placeholder value later. - Use the Redirect URIs text box to insert a placeholder redirect URI (e.g.
https://place-holder.com). This is the URI the user would be redirected to after presenting a credential on a same-device flow. You will update this placeholder value later. - Select the Create button to create the new application and display the Application detail screen.
- Copy and record the
IDvalue. You will use it later in the tutorial.
Make the following request to your MATTR VII tenant to create a verifier application configuration:
POST /v2/presentations/applications{
"name": "My Verifier Web Application",
"type": "web",
"domain": "place-holder.com",
"openid4vpConfiguration": {
"supportedModes": "all",
"redirectUris": ["https://place-holder.com"],
"display": {
"logoImage": {
"url": "https://static.mattr.global/logos/mattr/s/gFC.svg",
"altText": "MATTR Logo image"
},
"headerText": "Share your information.",
"bodyText": "Please scan the QR code to provide information required for completing this interaction."
}
},
"resultAvailableInFrontChannel": true
}name: You can use whatever name you'd like, as long as it is unique on your tenant.type: We will usewebas we are building a web application.domain: Here we define the web application domain name so that the MATTR VII tenant can verify incoming requests are from known and trusted applications. Aslocalhostis not supported we will use a tunneling service (ngrok) to test this tutorial. We will update this placeholder value later.openid4vpConfiguration:supportedModes: Setting this toallindicates that your web application will support both same-device and cross-device workflows.redirectUris: This is the URI the user would be redirected to after presenting a credential on a same-device flow. We will update this placeholder value later.display: Adjust the iframe modal appearance in cross-device flows:logoImage:url: Insert any publicly available URL of a logo image which is displayed on the top left corner of the iframe modal.altText: Edit the logo image alternative text.
headerText: Edit the header displayed in the iframe modal.bodyText: Edit the text displayed in the iframe modal.
resultAvailableInFrontChannel: Setting this totruemakes the verification results available directly to the web application. You can change this setting later if you choose to integrate a backend into the workflow.
Response
{
  "id": "0eaa8074-8cc4-41ec-9e42-072d36e2acb0",
  "name": "My Verifier Web Application"
  //... rest of application configuration
}id: We will use this value later to initialize the SDK so that requests coming from your web application can be recognized and trusted by the MATTR VII tenant.
Create a supported wallet configuration
Verifier web applications can define specific wallet applications to accept mDocs from as part of their verification workflows. The MATTR VII verifier tenant needs to be configured with a specific URI scheme that will be used to invoke these wallets.
- Expand the Credential Verification section in the left-hand navigation panel.
- Select Supported wallets.
- Select the Create new button.
- Use the Name text box to insert a meaningful and friendly name for your wallet application (for example "MATTR GO Hold").
- Use the Authorize endpoint text box to insert
mdoc-openid4vp://. This is the URI scheme that will be used to invoke the wallet application. More information on applying different URI schemes and the resulting user experience can be found in the workflow page. - Select the Create button to create the new wallet configuration.
The authorization endpoint configured in the example above
(mdoc-openid4vp://) is the default OID4VP scheme. While this is technically
redundant, we chose to include this step to explain how to adjust this
configuration for wallet applications using different schemes. More information on applying different URI schemes and the resulting user experience can be found in the workflow page.
Make the following request to your MATTR VII tenant to create a trusted wallet provider configuration:
POST /v2/presentations/wallet-providers{
"name": "MATTR GO Hold",
"openid4vpConfiguration": {
"authorizationEndpoint": "mdoc-openid4vp://"
}
}name: Unique name to identify this trusted wallet provider.authorizationEndpoint: URI scheme that will be used to invoke the wallet application. More information on applying different URI schemes and the resulting user experience can be found in the workflow page.
The authorizationEndpoint configured in the example above
(mdoc-openid4vp://) is the default OID4VP scheme. While this is technically
redundant, we chose to include this step to explain how to configure this
endpoint for wallet application using different schemes. More information on applying different URI schemes and the resulting user experience can be found in the workflow page.
Response
{
  "id": "99890c34-e4b7-4a23-84d6-e5de57114c00",
  "name": "MATTR GO Hold",
  "openid4vpConfiguration": {
    "authorizationEndpoint": "mdoc-openid4vp://"
  }
}id: We will use this value later to indicate this is the wallet the web application expects to receive mDocs from.
Configure a trusted issuer
You must configure trusted issuers on your MATTR VII verifier tenant, as presented mDocs will only be verified if they had been issued by a trusted issuer.
This is achieved by providing the PEM certificate of the IACA used by these issuers to sign mDocs. In production environments this certificate can be retrieved in one of two ways:
-
The issuer can provide it directly to the verifier out of band.
-
The verifier can retrieve it from the issuer's metadata:
- Make a GET request to the issuer's
/.well-known/openid-credential-issuerendpoint. - Retrieve the
mdoc_iacas_urielement from the response. - Make a GET request to that URI to retrieve the IACAs list (for example for a MATTR VII Issuer
tenant this URI would be
{tenant_url}/v1/openid/iacas).
- Make a GET request to the issuer's
- Expand the Credential Verification section in the left-hand navigation panel.
- Select Trusted issuers.
- Select the Create new button.
- Use the Certificate PEM file to upload the following file (ensure you extract the ZIP file and upload the .pem file itself). This is the IACA certificate that identifies the MATTR Labs demo issuer which issues the credential referenced in the prerequisites section.
- Select the Add button to add the new trusted issuer.
This completes the configuration of the MATTR VII verifier tenant. In the next step, you will build a simple application that you can run locally to test the verification workflow and ensure everything is functioning as expected.
Make the following request to your MATTR VII tenant to configure a truster issuer:
POST /v2/credentials/mobile/trusted-issuers{
"certificatePem": "-----BEGIN CERTIFICATE-----\nMIICYzCCAgmgAwIBAgIKXhjLoCkLWBxREDAKBggqhkjOPQQDAjA4MQswCQYDVQQG\nEwJBVTEpMCcGA1UEAwwgbW9udGNsaWZmLWRtdi5tYXR0cmxhYnMuY29tIElBQ0Ew\nHhcNMjQwMTE4MjMxNDE4WhcNMzQwMTE1MjMxNDE4WjA4MQswCQYDVQQGEwJBVTEp\nMCcGA1UEAwwgbW9udGNsaWZmLWRtdi5tYXR0cmxhYnMuY29tIElBQ0EwWTATBgcq\nhkjOPQIBBggqhkjOPQMBBwNCAASBnqobOh8baMW7mpSZaQMawj6wgM5e5nPd6HXp\ndB8eUVPlCMKribQ7XiiLU96rib/yQLH2k1CUeZmEjxoEi42xo4H6MIH3MBIGA1Ud\nEwEB/wQIMAYBAf8CAQAwDgYDVR0PAQH/BAQDAgEGMB0GA1UdDgQWBBRFZwEOI9yq\n232NG+OzNQzFKa/LxDAuBgNVHRIEJzAlhiNodHRwczovL21vbnRjbGlmZi1kbXYu\nbWF0dHJsYWJzLmNvbTCBgQYDVR0fBHoweDB2oHSgcoZwaHR0cHM6Ly9tb250Y2xp\nZmYtZG12LnZpaS5hdTAxLm1hdHRyLmdsb2JhbC92Mi9jcmVkZW50aWFscy9tb2Jp\nbGUvaWFjYXMvMjk0YmExYmMtOTFhMS00MjJmLThhMTctY2IwODU0NWY0ODYwL2Ny\nbDAKBggqhkjOPQQDAgNIADBFAiAlZYQP95lGzVJfCykhcpCzpQ2LWE/AbjTGkcGI\nSNsu7gIhAJfP54a2hXz4YiQN4qJERlORjyL1Ru9M0/dtQppohFm6\n-----END CERTIFICATE-----"
}certificatePem: This is the IACA identifying the MATTR Labs demo issuer which issues the credential referenced in the Testing device prerequisite.
If you intend to test this tutorial with a credential different than the one
recommended in our Testing device prerequisite, replace the
certificatePem value with your own issuer's IACA.
Response
A successful 201 response indicates that this issuer's certificate was added to your MATTR VII
tenant's trusted issuer's list. This means that mDocs that use this IACA as their root certificate
can be trusted and verified.
Part 2: Build a web application with mDocs verification capabilities
In this part of the tutorial, the verification result is passed directly from your MATTR VII tenant to your front-end application. This “front-channel” approach is designed for simplicity—it’s ideal for quick proofs of concept (POCs), experiments, or early-stage integrations where you want to see results quickly without needing a backend in place.
However, for more realistic POCs and any production-ready implementation, you’ll want to use a “back-channel” approach. In this model, your backend retrieves and verifies the result directly, allowing it to validate the original challenge and securely bind the verification outcome to a user session in your own system. This helps ensure the integrity of the verification flow, prevents tampering or spoofed responses, and allows your backend to maintain full trust in the result.
In the next part of the tutorial, we’ll show you how to extend your implementation with a backend service that securely retrieves verification results and ties them to user sessions in your own environment.
Now that the MATTR VII verifier tenant is properly configured, you can proceed with the steps required to embed verification capabilities into your web application:
- Setup your environment: Setup the required infrastructure for your web application.
- Update the domain and redirect URI: Once your tunneling service is up and running you can update the placeholder values in the MATTR VII verifier application configuration.
- Initialize the SDK: So that the SDK functions are available in your web application.
- Create a credential query: Define what information is required for verification and how to handle the interaction with the user.
- Handle verification results: Create the logic that enables your web application to retrieve verification results in different workflows.
Setup your environment
- Open your terminal and create a new NextJS default project:
npx create-next-app@latest --src-dir --yes- Approve installing any required packages.
- Insert a name for your project (e.g.
my-verifier-web-application). - Open the project app's folder:
cd my-verifier-web-application- Install the SDK:
npm install @mattrglobal/verifier-sdk-web- Open the
src/app/page.tsxfile in your preferred code editor and replace all existing code with the following:
"use client";

// Step 3.2 - Add dependencies

export default function Home() {
  // Step 5.1 - Store results state

  // Step 6.1 - Create createRequest function

  // Step 6.3 - Create retrieveResults function

  // Step 4.1 - Create requestCredentials function

  // Step 5.4 - Handle same-device redirect

  // Step 3.3 - Initialize the SDK

  // Step 5.5 - Add effect to handle redirect

  return (
    <div className="max-w-2xl mt-12 mx-auto px-8">
      <h1 className="text-3xl font-bold my-8">
        mDocs Online Verification Tutorial
      </h1>
      {/* Step 4.3 - Add request credentials button */}

      {/* Step 5.6 - Render results */}
    </div>
  );
}
This will serve as the basic structure for your application. We will copy and paste
different code snippets into specific locations to achieve the different functionalities.
These locations are indicated by comments that reference the corresponding tutorial step (e.g. // Step 3.2 - Add dependencies).
We recommend copying and pasting the comment text to easily locate it in the code.
- Run the project:
npm run devThis will run the app and make it available at http://localhost:3000 (or the next available port if 3000 is already used).
- Start an ngrok tunnel in a new terminal window:
ngrok http http://localhost:3000If your web application is running on a port different than 3000, use that value in the ngrok command above.
Your terminal window should show the tunnel details:
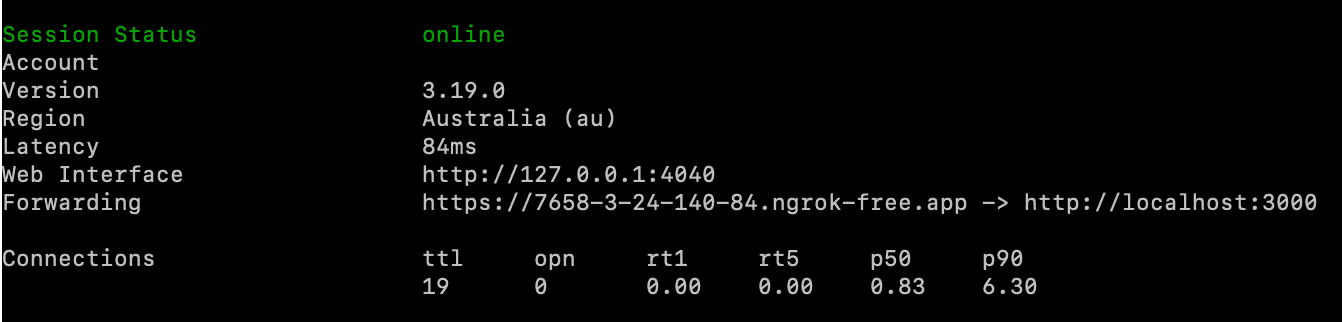
- Make note of the
Forwardingvalue, we will use it in the next step.
Update the domain and redirect URI
With the tunneling service now active, update the MATTR VII verifier application configuration to include the domain and redirect URI details.
-
Expand the Credential Verification section in the left-hand navigation panel.
-
Select Applications.
-
Select the verifier application configuration you created in the previous step.
-
Update the Allowed domains text box to include the
ForwardingURL from the ngrok tunnel, removing thehttps://prefix. -
Update the Redirect URIs text box to include the
ForwardingURL from the ngrok tunnel. -
Select the Update button to update the application configuration.
The
ForwardingURL is a temporary URL that will be used to test the web application. It will change every time you restart the ngrok tunnel, so you will need to repeat this step each time you restart the tunnel.
Make the following request to your MATTR VII tenant to update the verifier application configuration with the tunneling service details:
PUT /v2/presentations/applications/{applicationId}applicationId: Replace with theidfrom the response returned when you created the verifier application configuration.
{
  "name": "My Verifier Web Application",
  "type": "web",
  "domain": "your-ngrok-subdomain.ngrok.io",
  "openid4vpConfiguration": {
    "supportedModes": "all",
    "redirectUris": ["https://your-ngrok-subdomain.ngrok.io"],
    "display": {
      "logoImage": {
        "url": "https://static.mattr.global/logos/mattr/s/gFC.svg",
        "altText": "MATTR Logo image"
      },
      "headerText": "Share your information.",
      "bodyText": "Please scan the QR code to provide information required for completing this interaction."
    }
  },
  "resultAvailableInFrontChannel": true
}domain: Update this value to include theForwardingURL from the ngrok tunnel, removing thehttps://prefix.redirectUris: Update this value to include theForwardingURL from the ngrok tunnel.
Initialize SDK
-
Create a new file named
.env.localin the projects root folder and add the following code to add your tenant's URL to the project's variables:.env.local NEXT_PUBLIC_TENANT_URL=https://learn.vii.au01.mattr.global NEXT_PUBLIC_APPLICATION_ID=0eaa8074-8cc4-41ec-9e42-072d36e2acb0 NEXT_PUBLIC_WALLET_PROVIDER_ID=99890c34-e4b7-4a23-84d6-e5de57114c00NEXT_PUBLIC_TENANT_URL: Replace the parameter value with yourtenant_url.NEXT_PUBLIC_APPLICATION_ID: Replace the parameter value with theidfrom the response returned when you created the verifier application configuration.NEXT_PUBLIC_WALLET_PROVIDER_ID: Replace the parameter value with theidfrom the response returned when you created a wallet configuration.
-
Copy and paste the following code under the
Step 3.2 - Add dependenciescomment to add required dependencies to your web application:src/app/page.tsx import * as MATTRVerifierSDK from "@mattrglobal/verifier-sdk-web"; import { useCallback, useEffect, useState } from "react"; -
Copy and paste the following code under the
Step 3.3 - Initialize the SDKcomment to create a new function that will be used by your web application to initialize the SDK:src/app/page.tsx useEffect(() => { MATTRVerifierSDK.initialize({ apiBaseUrl: process.env.NEXT_PUBLIC_TENANT_URL as string, applicationId: process.env.NEXT_PUBLIC_APPLICATION_ID as string, }); }, []);The function calls the SDK's initialize function that makes the SDK methods available in your web application while defining the following parameters:
apiBaseUrl: This value is retrieved from theNEXT_PUBLIC_TENANT_URLproject variable defined above. It indicates to the Verifier Web SDK what MATTR VII tenant to interact with in order to verify presented mDocs.applicationId: This value is retrieved from theNEXT_PUBLIC_APPLICATION_IDproject variable defined above. This will be used by the MATTR VII tenant to identify verification requests from your web application.
Create credential request
Now that we have a function and a UI in place, we need to define what the function does by creating a credential request. This request will define what information is requested from the user, and how to interact with the MATTR VII verifier tenant.
-
Copy and paste the following code under the
Step 4.1 - Create requestCredential functioncomment to create a newrequestCredentialsfunction:src/app/page.tsx const requestCredentials = useCallback(async () => { const credentialQuery = { profile: MATTRVerifierSDK.OpenidPresentationCredentialProfileSupported.MOBILE, docType: "org.iso.18013.5.1.mDL", nameSpaces: { "org.iso.18013.5.1": { age_over_18: {}, given_name: {}, family_name: {}, portrait: {}, }, }, } as MATTRVerifierSDK.CredentialQuery; // Step 4.2 - Add credential request // Step 5.2 - Retrieve cross-device verification // Step 5.3 - Add setResults }, []);The function includes a
credentialQueryvariable that defines what information is requested from the user for verification. This example will request theage_over_18,given_name,family_nameandportraitclaims from a credential of profilemobileand docTypeorg.iso.18013.5.1.mDL, under theorg.iso.18013.5.1namespace. Presenting a credential with different claims, profile, docType or namespace will fail verification. -
Copy and paste the following code under the
Step 4.2 - Add credential requestcomment so that the newrequestCredentialsfunction calls the SDK'srequestCredentialsfunction, passing thecredentialQueryvariable as a parameter:src/app/page.tsx const options: MATTRVerifierSDK.RequestCredentialsOptions = { credentialQuery: [credentialQuery], // Step 6.2 - Use challenge from backend challenge: MATTRVerifierSDK.utils.generateChallenge(), openid4vpConfiguration: { redirectUri: window.location.origin, walletProviderId: process.env.NEXT_PUBLIC_WALLET_PROVIDER_ID, }, }; const results = await MATTRVerifierSDK.requestCredentials(options);options: This object defines the required parameters for calling the SDK'srequestCredentialsfunction. It is passed as a parameter to the function when calling it.credentialQuery: Defines what information is requested from the user for verification. In our example we are using the credential query created in the previous step.challenge: Unique challenge generated by the SDK to identify this specific presentation session. We will use it in part 3 of the tutorial.openid4vpConfiguration: This object defines the configuration necessary for an OID4VP presentation flow:redirectUri: Indicates that the user will be redirected to the same web application screen when completing a same-device workflow. It can be any other path on your application domain, as long as it is handled by the application. Must be on the same domain where the interaction started. See the workflow documentation for more information.walletProviderId: This value is retrieved from theNEXT_PUBLIC_WALLET_PROVIDER_IDproject variable defined above.
-
Copy and paste the following code under the
Step 4.3 - Add request credentials buttoncomment to create a new button that the user will use to interact with the web application:src/app/page.tsx <button onClick={requestCredentials} className="px-4 py-2 rounded border-2 border-black font-bold" > Request Credential </button>Once the user selects this button, the web application will trigger the verification workflow by calling the
requestCredentialsfunction created above:- This function calls the SDK's
requestCredentialsmethod which starts a presentation session with the configured MATTR VII session. - Once a session is established, the MATTR VII verifier tenant will interact with the user's wallet application to request and verify the details provided in the query.
- When the verification process is complete, the MATTR VII verifier tenant will return the verification results to your web application.
- This function calls the SDK's
Handle verification results
-
Copy and paste the following code under the
Step 5.1 - Store results statecomment to create a variable that will store the verification state:src/app/page.tsx const [results, setResults] = useState<MATTRVerifierSDK.PresentationSessionResult | null>(null); -
Copy and paste the following code under the
Step 5.2 - Retrieve cross-device verification resultscomment to retrieve verification results in cross-device workflows:src/app/page.tsx if (results.isOk()) { // Step 6.4 - Call retrieveResults function in cross-device workflow setResults( results.value.result as MATTRVerifierSDK.PresentationSessionResult, ); } else { alert(`Error retrieving results: ${results.error.message}`); } -
Add
setResultsin the square brackets under the// Step 5.3 - Add setResultsto set theresultsstate variable once results are available. Your code should look as follows:src/app/page.tsx }, [setResults]) -
Copy and paste the following code under the
Step 5.4 - Handle same-device redirectcomment to create a newhandleRedirectfunction:src/app/page.tsx const handleRedirect = useCallback(async () => { const results = await MATTRVerifierSDK.handleRedirectCallback(); if (results.isOk()) { // Step 6.6 - Call retrieveResults function on same-device redirect if (results.value.result) { setResults(results.value.result); } } else { alert(`Error retrieving results: ${results.error.message}`); return; } // Step 6.7 - Replace setResults function with retrieveResults function }, [setResults]);This function calls the SDK's handleRedirectCallback function, which returns the verification results as the user is redirected following a same-device presentation workflow. These results (
results.value.result) are then assigned to theresultsstate variable bysetResults. -
Copy and paste the following code under the
Step 5.5 - Add effect to handle redirectcomment to add an effect that calls thehandleRedirectfunction when the web application is refreshed with a hash, indicating a redirect after completing a same-device presentation workflow:src/app/page.tsx useEffect(() => { if (window.location.hash) { handleRedirect(); } }, [handleRedirect]); -
Copy and paste the following code under the
Step 5.6 - Render resultscomment to retrieve properties of theresultsobject once it is available, and display them to the user as part of the interaction:src/app/page.tsx <h2 className="text-xl font-bold mt-8 mb-4">Results</h2> { !results && "No results available" } { results && "credentials" in results && ( <div className="flex flex-col gap-2"> <div className="flex flex-row"> <div className="w-1/3 font-bold">Verification Result</div> <div className="w-2/3"> {results.credentials?.[0].verificationResult.verified ? "Verified" : "Not Verified"} </div> </div> <div className="flex flex-row"> <div className="w-1/3 font-bold">Valid Until</div> <div className="w-2/3"> {results.credentials?.[0].validityInfo?.validUntil} </div> </div> <div className="flex flex-row"> <div className="w-1/3 font-bold">Issuer</div> <div className="w-2/3"> {results.credentials?.[0].issuerInfo?.commonName} </div> </div> <div className="flex flex-row"> <div className="w-1/3 font-bold">Given Name</div> <div className="w-2/3"> {(results.credentials?.[0].claims?.["org.iso.18013.5.1"].given_name .value as string) ?? ""} </div> </div> <div className="flex flex-row"> <div className="w-1/3 font-bold">Age over 18</div> <div className="w-2/3"> {results.credentials?.[0].claims?.["org.iso.18013.5.1"].age_over_18 .value ? "Yes" : "No"} </div> </div> </div> ) } { results && "error" in results && ( <div className="flex flex-row"> <div className="w-1/3 font-bold">{results.error.type}</div> <div className="w-2/3">{results.error.message}</div> </div> ) }In this example when verification is successful (
"credentials" in results) the app retrieves and displays the following properties of the first credential (credentials?.[0]) of theresultsobject:verificationResult.verified: Indicates whether or not the mDoc was verified.validityInfo.validUntil: Indicates the mDoc expiry date.issuerInfo.commonName: Indicates the issuer's name.claims?.['org.iso.18013.5.1'].given_name: Indicates the holder's given name.claims?.['org.iso.18013.5.1'].age_over_18.value: Indicates whether or not the holder is over 18.
When verification fails (
"error" in results) the app retrieves and displays error details (error.typeanderror.message) from theresultsresponse.
Your web application will now continue the interaction based on the workflow type:
- For cross-device workflows, the web application will display the verification results in the desktop browser where the interaction started. The user can then continue the interaction on this desktop browser.
- For same-device workflows, the MATTR VII verifier tenant will redirect the user back to the web application in their mobile browser, where verification will be displayed. The user can then continue the interaction on this mobile browser.
Congratulations, your web application is now ready to verify mDocs.
Let's test what we've built!
Test the front channel interaction
- Open your ngrok forwarding URL in a browser on a mobile device where the MATTR GO Hold example app is installed.
- Select the Request Credential button.
- Select Allow to open the GO Hold app.
- The app should launch and display what information is requested for verification.
- Select Start.
- Select Confirm to share a credential which includes the requested information (claim one here if you haven't done so already).
- The web application should display the verification results as a string.
The result should look something like this:
- In a desktop browser, open your public ngrok forwarding URL (Do not use localhost as the cross-device flow requires a publicly accessible URL).
- Select the Request Credential button. A QR code will be displayed.
- Open the camera on a mobile device where MATTR GO Hold is installed and scan the QR code.
- Confirm opening the QR code with the GO Hold app.
- The app should launch and display what information is requested for verification.
- Select Start.
- Select Confirm to share a credential which includes the requested information (claim one here if you haven't done so already).
- Back on your desktop browser you the web application should display the verification results as a string.
The result should look something like this:
If your goal was just to see mDocs online verification in action, there's no need to proceed to the next step of the tutorial. However, production solutions often integrate a backend, and if you're curious about how that works, feel free to continue to the next step—it's optional and won't change the overall workflow, just what’s happening behind the scenes.
Part 3: Integrate a backend into your online verification workflow
Your online verification workflow is now working well using a front-channel flow, where results are passed directly from the MATTR VII tenant to your front-end application. This approach is ideal for quick and easy POCs, experiments, or demonstrations where you want to get up and running fast.
To make your solution more secure and representative of real-world integrations, it’s recommended to introduce a backend into the workflow. This “back-channel” approach allows your backend to retrieve and validate verification results directly from your MATTR VII tenant. It also enables you to correlate verification outcomes with user sessions in your own system—something that’s essential for realistic POCs and production deployments.
In this part of the tutorial, you’ll configure a simple backend service that securely retrieves verification results from your MATTR VII tenant, validates them, and then passes the verified outcome to your front-end application.
For more details on how the end-to-end workflow operates, refer to the detailed workflow documentation.
Update verifier application configuration
The first thing you need to do is to make sure verification results are not returned directly to the web application's front channel. This setting is part of your MATTR VII verifier application configuration.
-
Expand the Credential Verification section in the left-hand navigation panel.
-
Select Applications.
-
Select the verifier application configuration you created in the previous step.
-
Use the Verification results return method radio button to select Must be retrieved and validated by backend.
-
Select the Update button to update the application configuration.
This setting is only available when the application type is set to Web.
Make the following request to your MATTR VII tenant to update the verifier application configuration so that verification results are not returned directly to the web application's front channel:
PUT /v2/presentations/applications/{applicationId}applicationId: Replace with theidfrom the response returned when you created the verifier application configuration.
{
  "name": "My Verifier Web Application",
  "type": "web",
  "domain": "your-ngrok-subdomain.ngrok.io",
  "openid4vpConfiguration": {
    "supportedModes": "all",
    "redirectUris": ["https://your-ngrok-subdomain.ngrok.io"],
    "display": {
      "logoImage": {
        "url": "https://static.mattr.global/logos/mattr/s/gFC.svg",
        "altText": "MATTR Logo image"
      },
      "headerText": "Share your information.",
      "bodyText": "Please scan the QR code to provide information required for completing this interaction."
    }
  },
  "resultAvailableInFrontChannel": false
}resultAvailableInFrontChannel: Set this value tofalseto ensure that verification results are not returned directly to the web application's front channel. This is the only change required in the request body.
Add your MATTR VII login details
Your backend will need to make a request to a protected MATTR VII endpoint to retrieve the verification results. To enable this, we must provide it with your MATTR VII tenant login details.
-
Add the following code to your
.env.localfile to add your MATTR VII tenant login details:.env.local MATTR_CLIENT_ID=ZAGvD******************************** MATTR_CLIENT_SECRET=uc8NM****************************************
MATTR_CLIENT_ID: Replace with yourclient_idvalue.MATTR_CLIENT_SECRET: Replace with yourclient_secretvalue.
Create a session and associate a challenge
The web application backend needs to generate a unique challenge in the context of an existing user session. In a typical application, the user would likely already interact with the application inside an active session, and often that session is tracked using a cookie. In this tutorial we are mimicking this by setting a random value as the user session ID.
We are also creating a random challenge and storing it inside a cookie to ensure that the
presentation results we are retrieving belong to the user in the current user session.
- Create a new file at
src/app/api/request/route.tswith the following content:
import { cookies } from "next/headers";

export async function POST() {
  const sessionId = crypto.randomUUID();
  const challenge = crypto.randomUUID();

  const cookieStore = await cookies();
  cookieStore.set("session_id", sessionId, {
    httpOnly: true,
    secure: true,
    sameSite: true,
  });
  cookieStore.set("challenge", challenge, {
    httpOnly: true,
    secure: true,
    sameSite: true,
  });

  return Response.json({ challenge }, { status: 201 });
}
While it's not strictly necessary to keep the challenge secret, you might want to only use a
single encrypted session cookie to not leak any information about your session management.
If you use a database to store the sessions state, you could use that database to store the
challenge against the user session.
Retrieve verification results
Next we need to create an API route that will make a request to the MATTR VII verifier tenant and retrieve the results of a specific presentation session based on its ID.
-
Create a new file at
src/app/api/results/[id]/route.tswith the following content:src/app/api/results/[id]/route.ts import { cookies } from "next/headers"; async function getToken(tenantUrl: string) { const region = tenantUrl.split(".")[2]; const response = await fetch( `https://auth.${region}.mattr.global/oauth/token`, { method: "POST", headers: { "content-type": "application/json", }, body: JSON.stringify({ client_id: process.env.MATTR_CLIENT_ID, client_secret: process.env.MATTR_CLIENT_SECRET, audience: tenantUrl, grant_type: "client_credentials", }), }, ); const { access_token } = await response.json(); return access_token; } export async function GET( _: Request, { params }: { params: Promise<{ id: string }> }, ) { const tenantUrl = process.env.NEXT_PUBLIC_TENANT_URL; if (!tenantUrl) { return Response.json({ error: "No tenant URL configured" }); } const id = (await params).id; const cookiesStore = await cookies(); if (!cookiesStore.get("session_id")) { return Response.json( { error: "No valid session for user" }, { status: 401 }, ); } const response = await fetch( `${tenantUrl}/v2/presentations/sessions/${id}/result`, { headers: { authorization: `Bearer ${await getToken(tenantUrl)}`, }, }, ); const results = await response.json(); if (results.challenge !== cookiesStore.get("challenge")?.value) { return Response.json({ error: "Challenge does not match" }); } return Response.json({ results }); }The
getTokenfunction first uses project variables to retrieve a MATTR VII access token, as the results are retrieved from a protected endpoint.The route must be called with a dynamic
idroute parameter. This is the unique identifier of the presentation session. It is used in the authenticated request to the/v2/presentations/sessions/${id}/resultendpoint to retrieve the corresponding verification results.Your backend must then validate the returned results. The exact implementation would depend on your user session management, but you should always ensure that:
- The request to retrieve the results comes from an active user session (as per its
session_id). - The
challengeincluded in the response from the MATTR VII tenant matches thechallengeyou have stored for that active user session.
- The request to retrieve the results comes from an active user session (as per its
Adjust front channel to retrieve results via backend
Now that the backend is configured to retrieve the verification results, we need to adjust the front channel web application so that it can retrieve these results from the backend.
-
Return to your
src/app/page.tsxfile and copy and paste the following code under theStep 6.1 - Create createRequest functioncomment.src/app/page.tsx async function createRequest() { const response = await fetch("/api/request", { method: "POST" }); const { challenge } = await response.json(); return challenge; } -
Replace the
challengeassignment under theStep 6.2 - Use challenge from backendcomment with the following code to call thecreateRequestfunction to generate a challenge:src/app/page.tsx challenge: await createRequest(), -
Add the following code under the
Step 6.3 - Create retrieveResults functioncomment to create a new function that retrieves the verification results:src/app/page.tsx const retrieveResults = useCallback( async (id: string) => { const response = await fetch(`api/results/${id}`); const { results } = await response.json(); setResults(results as MATTRVerifierSDK.PresentationSessionResult); }, [setResults], );This function uses the API route created above to retrieve the verification results and use
setResultsto assign them to theresultsstate variable -
Replace the
setResultscall under theStep 6.4 - Call retrieveResults function in cross-device workflowwith the following code to call the newretrieveResultsfunction in the callback of a cross-device workflow:src/app/page.tsx retrieveResults(results.value.sessionId); -
Replace the
setResultsfunction in the square brackets under the// Step 5.3 - Add setResultscomment with theretrieveResultsfunction. Your code should look like this:src/app/page.tsx }, [retrieveResults]) // requestCredentials dependency array -
Replace the whole conditional around the
setResultscall under theStep 6.6 - Call retrieveResults function on same-device redirectwith the following code to call the newretrieveResultsfunction when the user is redirected to the app following a same-device workflow:src/app/page.tsx retrieveResults(results.value.sessionId); -
Replace the
setResultsfunction in the brackets under the// Step 6.7 - Replace setResults function with retrieveResults functioncomment with theretrieveResultsfunction. The line should look like this:src/app/page.tsx }, [retrieveResults])
Your web application now has an integrated backend that can validate verification results before passing them to the front channel, making the solution more secure.
Test the backend interaction
Let's test to ensure everything is working as expected.
- Repeat the steps in the front channel testing step above.
- The interaction should look the same, but behind the scenes it will actually be handled by your backend.
What's next?
- You can adjust the app built in this tutorial to request and verify credentials using the Digital Credentials API, as detailed in the DC API Guide.
- This project was run and tested locally using tunneling services. To build similar online
verification capabilities into a production web application, all you need to do is replace the
domainandredirectUriwith the corresponding values of your production web application. - This project was created to showcase happy paths. It is recommended to review our comprehensive SDK reference documentation to learn more about available functions and classes.
- As always, feel free to reach out if you have any questions or encounter any issues we can help with.
How would you rate this page?
Last updated on