Learn how to build an iOS application that can verify an mDoc presented via a proximity workflow
Overview
In this tutorial we will use the iOS mDoc verifier SDK to build an iOS application that can verify an mDoc presented via a proximity workflow as per ISO 18013-5:

- The credential holder presents a QR code generated by their wallet application.
- The verifier uses their application to scan the QR code, connect with the wallet and request an mDoc for verification.
- The wallet application displays matching credentials to the holder and asks for consent to share them with the verifier.
- The verifier application receives the wallet’s response and verifies the provided credential.
- Verification results are displayed to the verifier.
The result will look something like this:
To achieve this, you will build the following capabilities into your iOS verifier application:
- Initialise the SDK, so that your application can use its functions and classes.
- Manage certificates, which enable your application to verify mDocs that were issued by trusted issuers.
- Scan a QR code presented by a wallet application and establish a secure communication channel.
- Send presentation requests to the wallet application, receive a presentation response and verify its content.
- Display the results to the verifier app user.

Prerequisites
Before we get started, let’s make sure you have everything you need.
Prior knowledge
-
The proximity verification workflow described in this tutorial is based on the ISO 18013-5 standard. If you are unfamiliar with this standard, refer to the following Docs for more information:
- What are mDocs?
- What is credential verification?
- Breakdown of the proximity presentation workflow.
-
We assume you have experience developing iOS native apps in Swift.
If you need to get a verifier solution up and running quickly with minimal development resources and in-house domain expertise, talk to us about our white-label MATTR GO Verifier which might be a good fit for you.
Assets
- As part of your onboarding process you should have been provided with access to the following
assets:
- ZIP file which includes the required framework:
(
MobileCredentialVerifierSDK-*version*.xcframework.zip). - Sample Verifier app: You can use this app for reference as we work through this tutorial.
- ZIP file which includes the required framework:
(
Development environment
- Xcode setup with either:
- Local build settings if you are developing locally.
- iOS developer account if you intend to publish your app.
Testing devices
As this tutorial implements a proximity presentation workflow, you will need two different mobile devices to test the end-to-end result:
- Verifier device:
- Supported iOS device to run the built Verifier application on, setup with:
- Bluetooth access.
- Available internet connection.
- Supported iOS device to run the built Verifier application on, setup with:
- Holder device:
- Mobile device with the MATTR GO Hold example app
installed and setup with:
- Biometric authentication.
- Bluetooth access.
- Available internet connection.
- Mobile device with the MATTR GO Hold example app
installed and setup with:
mDoc
- Download and install the MATTR GO Hold example app on your wallet testing device.
- Use the GO Hold example app to claim an mDoc by scanning the following QR code:

Got everything? Let’s get going!
Environment setup

Perform the following steps to setup and configure your development environment:
Create a new project
Please follow the detailed instructions to Create a new Xcode Project and add your organisation’s identifier.

Unzip the dependencies file
- Unzip the
MobileCredentialVerifierSDK-*version*.xcframework.zipfile. - Drag the
MobileCredentialVerifierSDK-*version*.xcframeworkfolder into your project. - Configure
MobileCredentialVerifierSDK.xcframeworkto Embed & sign.
See Add existing files and folders for detailed instructions.
This should result in the the following framework being added to your project:

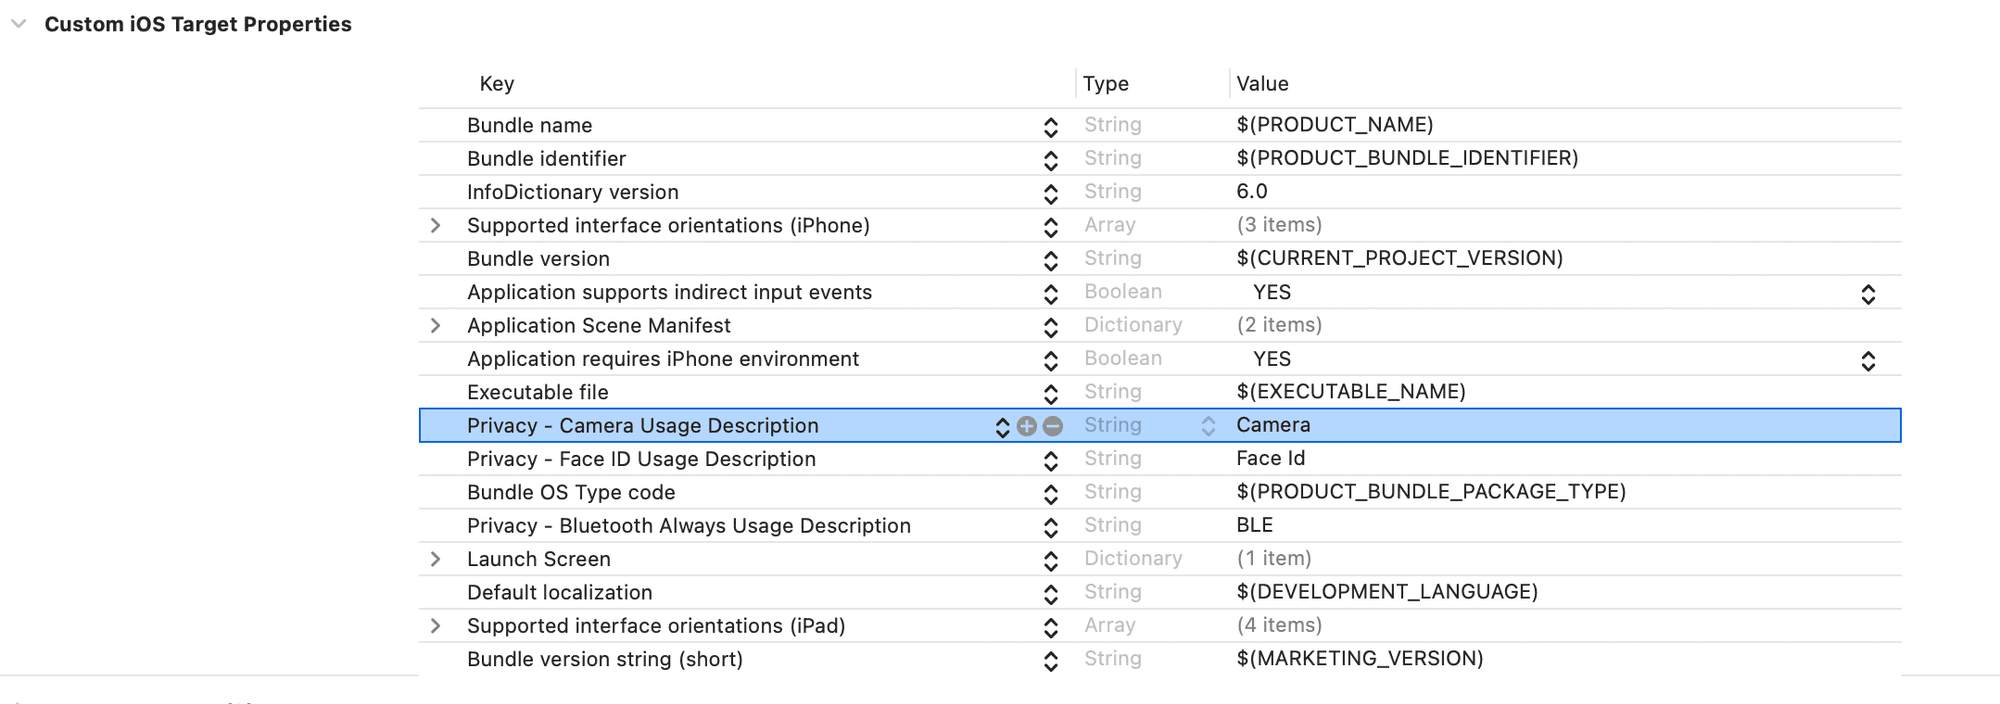
Add Bluetooth permissions
The SDK requires access to the mobile device Bluetooth capabilities as part of the proximity
presentation workflow.
Configure these permissions in the Info
tab of the Application target:

Run the application
Select Run and make sure the application launches with a “Hello, world!” text in the middle of the display, as shown in the following image:
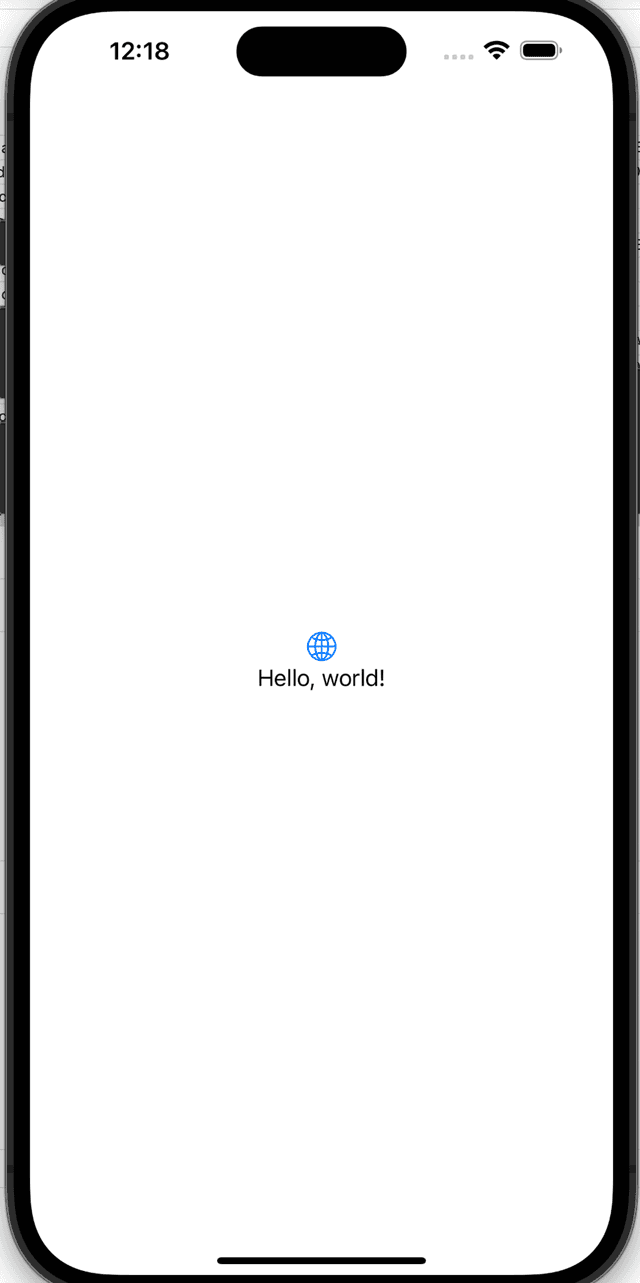
Nice work, your application is now all set to begin using the SDK!
Initialise the SDK

The first capability you will build into your app is to initialise the SDK so that your app can use
SDK functions and classes. To achieve this, we need to import the MobilecredentialVerifierSDK
framework and then initialise the MobileCredentialVerifier class.
Create the application structure
-
Open the
ContentViewfile in your new project and replace any existing code with the following:Swiftimport SwiftUI import MobileCredentialVerifierSDK struct ContentView: View { @ObservedObject var viewModel: VerifierViewModel = VerifierViewModel() // Verify mDocs - Step 4.4: Add the isPresentingResponseView variable var body: some View { NavigationStack { VStack(spacing: 20) { // Manage certificates - Step 1.2: Add Certificate Management button // Verify mDocs - Step 2.5: Add Scan QR Code button // Verify mDocs - Step 4.3: Add View Response button } // Manage certificates - Step 1.3: Add navigation destination logic } } // Verify mDocs - Step 2.4: Create QRScannerView } class VerifierViewModel: ObservableObject { // Initialise SDK - Step 2.1: Add MobileCredentialVerifier var // Verify mDocs - Step 1.1: Create MobileCredentialRequest instance // Verify mDocs - Step 1.2: Create receivedDocuments variable init() { do { // Initialise SDK - Step 2.2: Initialise MobileCredentialVerifier SDK } catch { print(error.localizedDescription) } } // Verify mDocs - Step 3.1: Create setupProximityPresentationSession // Verify mDocs - Step 3.2: Create sendDeviceRequest function } // Manage certificates - Step 1.1: Create CertificateManagementView view // Verify mDocs - Step 4.1: Create MobileCredentialClaimListView view // Verify mDocs - Step 4.2: Create PresentationResponseViewThis will serve as the basic structure for your application. We will copy and paste different code snippets into specific locations in this codebase to achieve the different functionalities. These locations are indicated by comments that reference both the section and the step.
Initialise the MobileCredentialVerifier class
- Add the following code after the
// Initialise SDK - Step 2.1: Add MobileCredentialVerifier varcomment to create a variable that holds themobileCredentialVerifierinstance:
We recommend copying and pasting the comment text (e.g. // Initialise SDK - Step 2.1: Add MobileCredentialVerifier var) to easily locate it in the code.
var mobileCredentialVerifier: MobileCredentialVerifier-
Add the following code after the
// Initialise SDK - Step 2.2: Initialise MobileCredentialVerifier SDKcomment to initialise the SDK and create a new instance in theMobileCredentialVerifiervariable:SwiftmobileCredentialVerifier = MobileCredentialVerifier.shared try mobileCredentialVerifier.initialise() -
Run the app to make sure it compiles properly.
Manage certificates

Once the SDK is initialised, the next step is to build the capability for the application to manage certificates.

Every mDoc is signed by a series of certificates, referred to as a chain of trust. For your application to verify a presented mDoc it must validate it was signed using a root certificate (IACA) associated with a trusted issuer.
To enable this, your application can provide an interface for the user to manage (add, view and
remove) certificates. We will achieve this by creating a new CertificateManagementView view and
building certificate management capabilities into it.
Create the Certificate Management view
-
Add the following code under the
// Manage certificates - Step 1.1: Create CertificateManagementView viewto create a new view where the user will manage certificates in the app.Swiftstruct CertificateManagementView: View { // Certificate Management ViewModel will handle the logic @ObservedObject var viewModel = CertificateManagementViewModel() // This var holds a pem string of a certificate to be added @State var certificateString = "" var body: some View { Form { Section( header: Text("IACA Certificate").font(.headline), footer: HStack { Spacer() Button("Add", action: { // Manage Certificates - Step 2.6: Call addCertificate function }) Spacer().frame(width: 30) Button("Clear", action: { certificateString = "" }) .foregroundColor(.red) .contentShape(Rectangle()) .frame(alignment: .trailing) } ) { TextField("IACA certificate string", text: $certificateString) } Section( header: Text("Stored Certificates").font(.headline) ) { // Manage Certificates - Step 2.4: Display retrieved certificates } } .navigationBarTitle("Certificate Setting") .onAppear { // Manage Certificates - Step 2.3: Call getCertificates function } } } class CertificateManagementViewModel: ObservableObject { // Manage Certificates - Step 2.1: Add certificates variable // Manage Certificates - Step 2.2: Create getCertificates function // Manage Certificates - Step 2.5: Create addCertificate function // Manage Certificates - Step 2.7: Create removeCertificate function } -
Add the following code under the
// Manage certificates - Step 1.2: Add Certificate Management buttoncomment to add a new button for the user to select to navigate to the newCertificateManagementView:SwiftNavigationLink("Certificate Management", value: "CertificateManagement") .font(.headline) .foregroundColor(.blue) .padding() .background(Color.gray.opacity(0.2)) .cornerRadius(10) -
Add the following code under the
// Manage certificates - Step 1.3: Add navigation destination logiccomment to create the logic that associates the button with the correct view:Swift.navigationDestination(for: String.self) { value in switch value { case "CertificateManagement": CertificateManagementView(viewModel: CertificateManagementViewModel()) // Verify mDocs - Step 2.6: Add QR code view destination // Verify mDocs - Step 4.6: Add Response view destination default: EmptyView() } } -
Run the app and select the Certificate Management button. You should see a result similar to the following:
As the user selects the Certificate Management button they are navigated to the new
CertificateManagement view where they can see controls that would enable them to add, view and
remove certificates. We will build these capabilities into the controls in the next step.
Add Certificate Management functionalities
Currently our CertificateManagementView view has no functionalities. Let’s fix this by adding the
capabilities to add, view and remove certificates.
-
Add the following code under the
// Manage Certificates - Step 2.1: Add certificates variablecomment to add a newcertificatesvariable that will hold the certificates added to the application:Swift@Published var certificates: [TrustedCertificate] = [] let mobileCredentialVerifier = MobileCredentialVerifier.shared -
Add the following code under the
// Manage Certificates - Step 2.2: Create getCertificates functioncomment to create a newgetCertificatesfunction that calls the SDK getTrustedIssuerCertificates and enables the application to retrieve all certificates and display them to the user:Swiftfunc getCertificates() { do { let fetchedCertificates = try mobileCredentialVerifier.getTrustedIssuerCertificates() // Updating the UI from the main thread DispatchQueue.main.async { self.certificates = fetchedCertificates } } catch { print(error.localizedDescription) } } -
Add the following code under the
// Manage Certificates - Step 2.3: Call getCertificates functioncomment to call the newgetCertificatesfunction from within theCertificateManagementViewonce the view is loaded:SwiftviewModel.getCertificates() -
Add the following code under the
// Manage Certificates - Step 2.4: Display retrieved certificatescomment to iterate over retrieved certificates and display them to the user:SwiftForEach(viewModel.certificates, id: \.id) { certificate in Text("\(certificate.pem)") .frame(maxHeight: 100) // Manage Certificates - Step 2.8: Call removeCertificate function } -
Add the following code under the
// Manage Certificates - Step 2.5: Create addCertificate functioncomment to create a newaddCertificatefunction that calls the SDK addTrustedIssuerCertificates and enables the application to accept a string parameter and use it to add a new certificate:Swiftfunc addCertificate(_ certificate: String) { Task { do { _ = try await mobileCredentialVerifier.addTrustedIssuerCertificates(certificates: [certificate]) self.getCertificates() } catch { print(error.localizedDescription) } } } -
Add the following code under the
// Manage Certificates - Step 2.6: Call addCertificate functioncomment to call the newaddCertificatefunction from within theCertificateManagementViewonce the user provides a string (which is stored in thecertificateStringvariable) and selects the Add button:SwiftviewModel.addCertificate(certificateString) -
Add the following code under the
// Manage Certificates - Step 2.7: Create removeCertificate functioncomment to create a newremoveCertificatefunction that calls the SDK deleteTrustedIssuerCertificate and enables the application to remove a selected certificate:Swiftfunc removeCertificate(_ certificateID: String) { do { try mobileCredentialVerifier.deleteTrustedIssuerCertificate(certificateId: certificateID) // Refresh the certificates list after deletion self.getCertificates() } catch { print(error.localizedDescription) } } -
Add the following code under the
// Manage Certificates - Step 2.8: Call removeCertificate functioncomment to call the newremoveCertificatefunction from within theCertificateManagementViewonce the user performs a swipe action on an individual certificate:Swift.swipeActions(edge: .trailing) { Button(role:. destructive) { viewModel.removeCertificate(certificate.id) } label: { Image(systemName: "trash") } } -
Run the app and perform the following instructions:
-
Select the Manage Certificates button.
-
Copy and paste the following text into the IACA Certificate text box.
MIICYzCCAgmgAwIBAgIKXhjLoCkLWBxREDAKBggqhkjOPQQDAjA4MQswCQYDVQQG
EwJBVTEpMCcGA1UEAwwgbW9udGNsaWZmLWRtdi5tYXR0cmxhYnMuY29tIElBQ0Ew
HhcNMjQwMTE4MjMxNDE4WhcNMzQwMTE1MjMxNDE4WjA4MQswCQYDVQQGEwJBVTEp
MCcGA1UEAwwgbW9udGNsaWZmLWRtdi5tYXR0cmxhYnMuY29tIElBQ0EwWTATBgcq
hkjOPQIBBggqhkjOPQMBBwNCAASBnqobOh8baMW7mpSZaQMawj6wgM5e5nPd6HXp
dB8eUVPlCMKribQ7XiiLU96rib/yQLH2k1CUeZmEjxoEi42xo4H6MIH3MBIGA1Ud
EwEB/wQIMAYBAf8CAQAwDgYDVR0PAQH/BAQDAgEGMB0GA1UdDgQWBBRFZwEOI9yq
232NG+OzNQzFKa/LxDAuBgNVHRIEJzAlhiNodHRwczovL21vbnRjbGlmZi1kbXYu
bWF0dHJsYWJzLmNvbTCBgQYDVR0fBHoweDB2oHSgcoZwaHR0cHM6Ly9tb250Y2xp
ZmYtZG12LnZpaS5hdTAxLm1hdHRyLmdsb2JhbC92Mi9jcmVkZW50aWFscy9tb2Jp
bGUvaWFjYXMvMjk0YmExYmMtOTFhMS00MjJmLThhMTctY2IwODU0NWY0ODYwL2Ny
bDAKBggqhkjOPQQDAgNIADBFAiAlZYQP95lGzVJfCykhcpCzpQ2LWE/AbjTGkcGI
SNsu7gIhAJfP54a2hXz4YiQN4qJERlORjyL1Ru9M0/dtQppohFm6
-
You will need to copy this text from the device you are using to display this tutorial and paste it in the device where you are running the built application. There are several ways to achieve this on iOS devices, one of them is setting up a Universal Clipboard.
-
Select the Add button. The new certificate should appear in the STORED CERTIFICATES area.
-
Swipe left across the new certificate and select the Delete icon to remove it.
You should get a result similar to the following:
- When the user selects the Certificate Management button they are navigated to the
CertificateManagementview. - When the user adds the text and selects the Add button a new certificate is added and displayed in the STORED CERTIFICATES area.
- When the user swipes left and selects the Delete icon the certificate is removed.
You have now built the capabilities required to manage certificates in your verifier applications. Now we can proceed to building the capabilities to handle the actual presentation workflow.
Verify mDocs

In this part we will build the components that enable a verifier app to verify an mDoc presented via a proximity workflow as per ISO 18013-5:
To achieve this, your application must be able to:
- Create a presentation request that defines the information required for verification.
- Scan and process a QR code created presented by a wallet application.
- Establish a secure connection with the wallet over Bluetooth, share the presentation request and receive a response.
- Verify the response and display the results to the verifier app user.
Create a presentation request
As a verifier, you can select what information you request for verification. Our application implements this by creating a MobileCredentialRequest instance to define the required information, and a new variable to hold the response from the wallet application.
-
Add the following code under the
Verify mDocs - Step 1.1: Create MobileCredentialRequest instancecomment to define what information to request from the wallet application user:Swiftlet mobileCredentialRequest = MobileCredentialRequest( docType: "org.iso.18013.5.1.mDL", namespaces: [ "org.iso.18013.5.1": [ "family_name": false, "given_name": false, "birth_date": false ] ] )This object details:
- The requested credential type (e.g.
org.iso.18013.5.1.mDL). - The claims required for verification (e.g.
family_name). - The requested namespace (e.g.
org.iso.18013.5.1). - Whether or not the verifier intends to persist the claim value (
true/false).
For the verification to be successful, the presented credential must include the referenced claim against the specific namespace defined in the request. Our example requests the
birth_dateunder theorg.iso.18013.5.1namespace. If a wallet responds to this request with a credential that includes abirth_datebut rather under theorg.iso.18013.5.1.USnamespace, the claim will not be verified. - The requested credential type (e.g.
To simplify the tutorial, this is a hardcoded request. However, once you are comfortable with the basic functionalities you can create a UI in your verifier application that enables the user to create different requests on the fly by selecting different claims to include. See our GO Verify app as an example.
-
Add the following code under the
Verify mDocs - Step 1.2: Create receivedDocuments variableto create a newreceivedDocumentsvariable that will hold the response from the wallet application:Swift@Published var receivedDocuments: [MobileCredentialPresentation] = []
Now your application has an existing request to share, and a variable to hold any incoming responses. We can now proceed to build the capabilities to send the request and handle the response.
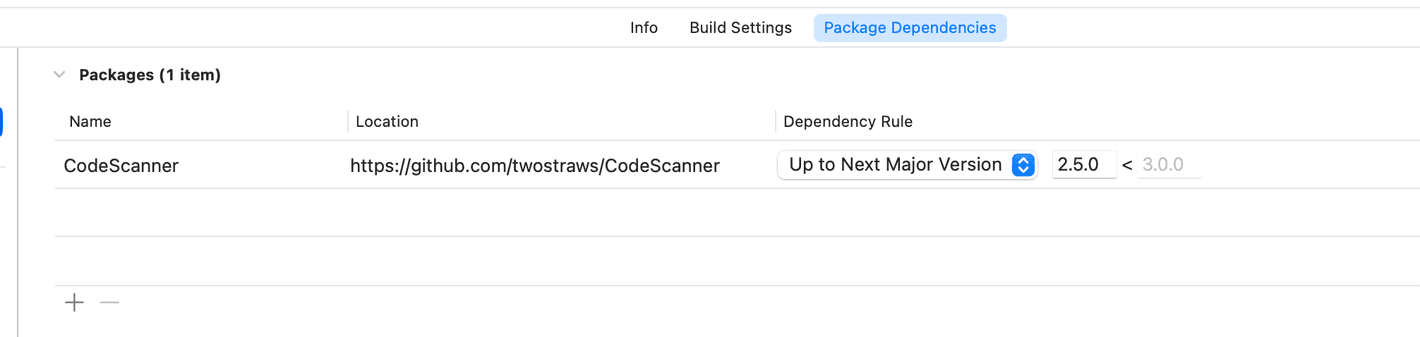
Scan and process a QR code

As defined in ISO 18130-5, a proximity presentation workflow is always initiated by the holder (wallet application user), who must create a QR code for the verifier to scan in order to initiate the device engagement phase.

This means that your verifier application must be able to scan and process this QR code. For ease of implementation, we will use a third party framework to achieve this.
-
Add camera usage permissions to the app target:
-
Add the CodeScanner library via Swift Package Manager.
-
Create a new swift file named
QRScannerViewand add the following code into it to implement the QR scanning capability:Swiftimport SwiftUI import CodeScanner struct QRScannerView: View { private let completionHandler: (String) -> Void init(completion: @escaping (String) -> Void) { completionHandler = completion } var body: some View { CodeScannerView(codeTypes: [.qr]) { result in switch result { case .failure(let error): print(error.localizedDescription) case .success(let result): print(result.string) completionHandler(result.string) } } } } -
Back in the
ContentViewfile, add the following code under the// Verify mDocs - Step 2.4: Create QRScannerViewto create a new app view that the user will use to scan a QR code:Swiftvar codeScannerView: some View { QRScannerView( completion: { string in // Verify mDocs - Step 3.3: Pass string from QR code to presentation session // Verify mDocs - Step 4.5: Change isPresentingResponseView to true } ) } -
Add the following code under the
// Verify mDocs - Step 2.5: Add Scan QR Code buttonto add a new button for the user to select to navigate to the newQRScannerView:SwiftNavigationLink("Scan QR Code", value: "ScanQRCode") .font(.headline) .foregroundColor(.blue) .padding() .background(Color.gray.opacity(0.2)) .cornerRadius(10) -
Add the following code under the
// Verify mDocs - Step 2.6: Add QR code view destinationcomment to create the logic that associates the button with the correct view:Swiftcase "ScanQRCode": codeScannerView -
Run the app and select the Scan QR Code button. You should be navigated to the new
QRScannerViewwhere you can use the camera to scan a QR code.
Now we will build the logic that handles this QR code to establish a secure connection with the wallet application.
Exchange presentation request and response

Once the verifier has scanned the QR code presented by the wallet application, your application must retrieve the information from that QR code and use it to establish a secure connection between the verifier and holder devices.
The verifier then uses this secure connection to send a presentation request to which the holder wallet application responds with a presentation response. The SDK then verifies any mDocs included in the response and stored the verification results in a variable.
To achieve this, your application must use the SDK’s createProximityPresentationSession function that takes a string retrieved from the QR code and uses it to establish a proximity presentation session with the wallet application and initiate the presentation workflow.
-
Add the following code under the
// Verify mDocs - Step 3.1: Create setupProximityPresentationSessionto create a newsetupProximityPresentationSessionfunction that:- Retrieves the string from the QR code.
- Establishes a secure connection with the wallet application by creating a
proximityPresentationSessioninstance. - Sends a presentation request by calling the
sendDeviceRequestfunction:
Swiftfunc setupProximityPresentationSession(_ string: String) { Task { do { let _ = try await mobileCredentialVerifier.createProximityPresentationSession( encodedDeviceEngagementString: string, onSessionTerminated: { _ in print("Session Terminated") } ) sendDeviceRequest() } catch { print(error.localizedDescription) } } }
Your app cannot compile at this stage as we will only created the sendDeviceRequest function
in the next step.
-
Add the following code under the
// Verify mDocs - Step 3.2: Create sendDeviceRequest functioncomment to create a newsendDeviceRequestfunction. This function calls the existingproximityPresentationSessioninstancerequestMobileCredentialsfunction, which:- Accepts an array of
MobileCredentialRequests. - Sends the requests to the wallet application.
- Receives a response from the wallet application.
- Verifies any mDocs included in the response.
- Stores the verification results in the
receivedDocumentsvariable:
Swiftfunc sendDeviceRequest() { Task { @MainActor in do { // Refresh the list of received documents if !receivedDocuments.isEmpty { receivedDocuments = [] } // Find the existing proximity presentation session. let presentationSession = try? mobileCredentialVerifier.getCurrentProximityPresentationSession() // Request mDocs let deviceResponse = try await presentationSession?.requestMobileCredentials( request: [mobileCredentialRequest] ) // Assign new values from the response receivedDocuments = deviceResponse?.credentials ?? [] // Terminate session after response is received (optional) await presentationSession?.terminateSession() } catch { print(error) receivedDocuments = [] } } } - Accepts an array of
-
Add the following code under the
// Verify mDocs - Step 3.3: Pass string from QR code to presentation sessioncomment to pass the string retrieved from the scanned QR code to the presentation session function:SwiftviewModel.setupProximityPresentationSession(string)
Now that we have the verification results stored, you can implement different business logics to handle the results.
For this tutorial, we will only display these results to the verifier app user, individually indicating the verification status of each claim included in the request.
Display verification results

We will now create a new view that is automatically displayed when verification results are available.
-
Add the following code under the
// Verify mDocs - Step 4.1: Create MobileCredentialClaimListView viewcomment to create a newMobileCredentialClaimListViewview that parses all claims from the presented mDocs and displays them to the verifier app user:Swiftstruct MobileCredentialClaimListView: View { let claims: [MobileCredentialDataTypes.NameSpace: [MobileCredentialDataTypes.ElementID: Any]] var body: some View { Form { ForEach(claims.keys.sorted(), id: \.self) { namespace in Section(header: Text(namespace).font(.title2)) { ForEach(claims[namespace]!.sorted(by: { $0.key < $1.key }), id: \.key) { key, value in HStack { Text(key) Spacer() Text(String(describing: value)) } } } } } } }
Your app cannot compile at this stage until we complete all steps of this section.
-
Add the following code under the
// Verify mDocs - Step 4.2: Create PresentationResponseViewcomment to create a newPresentationResponseViewview that displays verified and failed claims as soon as thereceivedDocumentsvariable is not empty:Swiftstruct PresentationResponseView: View { @Binding var receivedDocuments: [MobileCredentialPresentation] var body: some View { if receivedDocuments.isEmpty { VStack(spacing: 40) { Text("Waiting for response...") .font(.title3) ProgressView() .progressViewStyle(.circular) .scaleEffect(2) } } else { Text("Verified claims").font(.title3.bold()) ForEach(receivedDocuments, id: \.docType) { doc in MobileCredentialClaimListView(claims: doc.claims ?? [:]) } Text("Failed claims").font(.title3.bold()) ForEach(receivedDocuments, id: \.docType) { doc in MobileCredentialClaimListView(claims: doc.claimErrors ?? [:]) } .padding(10) } } } -
Add the following code under the
// Verify mDocs - Step 4.3: Add View Response buttoncomment to add a new View Response button that the user can use to manually navigate to the newPresentationResponseViewview if required:SwiftNavigationLink("View Response", value: "ViewResponse") .font(.headline) .foregroundColor(.blue) .padding() .background(Color.gray.opacity(0.2)) .cornerRadius(10) .navigationTitle("Main Menu") .navigationBarTitleDisplayMode(.inline) .navigationDestination(isPresented: $isPresentingResponseView) { PresentationResponseView(receivedDocuments: $viewModel.receivedDocuments) } .navigationDestination(for: String.self) { value in switch value { case "CertificateManagement": CertificateManagementView(viewModel: CertificateManagementViewModel()) case "ScanQRCode": codeScannerView case "ViewResponse": PresentationResponseView(receivedDocuments: $viewModel.receivedDocuments) default: EmptyView() } }
Your app cannot compile at this stage until we complete all steps of this section.
-
Add the following code under the
// Verify mDocs - Step 4.4: Add the isPresentingResponseView variablecomment to add a newisPresentingResponseViewvariable that is used to indicate whether or not the response view should be displayed.Swift@State private var isPresentingResponseView = false -
Add the following code under the
// Verify mDocs - Step 4.5: Change isPresentingResponseView to truecomment to change theisPresentingResponseViewvariable totrue, indicating the verifier app should navigate to thePresentationResponseViewview.SwiftisPresentingResponseView = true -
Add the following code under the
// Verify mDocs - Step 4.6: Add Response view destinationcomment to create the logic that associates the button with the correct view:Swiftcase "ViewResponse": PresentationResponseView(receivedDocuments: $viewModel.receivedDocuments)
Test the end-to-end workflow

-
Run the app.
-
Select the Certificate Management button.
-
Copy and paste the following text into the IACA Certificate text box.
MIICYzCCAgmgAwIBAgIKXhjLoCkLWBxREDAKBggqhkjOPQQDAjA4MQswCQYDVQQG
EwJBVTEpMCcGA1UEAwwgbW9udGNsaWZmLWRtdi5tYXR0cmxhYnMuY29tIElBQ0Ew
HhcNMjQwMTE4MjMxNDE4WhcNMzQwMTE1MjMxNDE4WjA4MQswCQYDVQQGEwJBVTEp
MCcGA1UEAwwgbW9udGNsaWZmLWRtdi5tYXR0cmxhYnMuY29tIElBQ0EwWTATBgcq
hkjOPQIBBggqhkjOPQMBBwNCAASBnqobOh8baMW7mpSZaQMawj6wgM5e5nPd6HXp
dB8eUVPlCMKribQ7XiiLU96rib/yQLH2k1CUeZmEjxoEi42xo4H6MIH3MBIGA1Ud
EwEB/wQIMAYBAf8CAQAwDgYDVR0PAQH/BAQDAgEGMB0GA1UdDgQWBBRFZwEOI9yq
232NG+OzNQzFKa/LxDAuBgNVHRIEJzAlhiNodHRwczovL21vbnRjbGlmZi1kbXYu
bWF0dHJsYWJzLmNvbTCBgQYDVR0fBHoweDB2oHSgcoZwaHR0cHM6Ly9tb250Y2xp
ZmYtZG12LnZpaS5hdTAxLm1hdHRyLmdsb2JhbC92Mi9jcmVkZW50aWFscy9tb2Jp
bGUvaWFjYXMvMjk0YmExYmMtOTFhMS00MjJmLThhMTctY2IwODU0NWY0ODYwL2Ny
bDAKBggqhkjOPQQDAgNIADBFAiAlZYQP95lGzVJfCykhcpCzpQ2LWE/AbjTGkcGI
SNsu7gIhAJfP54a2hXz4YiQN4qJERlORjyL1Ru9M0/dtQppohFm6
-
You will need to copy this text from the device you are using to display this tutorial and paste it in the device where you are running the built application. There are several ways to achieve this on iOS devices, one of them is setting up a Universal Clipboard.
- Select the Add button.
- Return to the app main screen.
- Open your wallet testing device and launch the GO Hold example app.
- Select the Wallet button.
- Locate the mDoc claimed earlier in this tutorial and select the share button to display a QR code.
- Use your verifier testing device and select the Scan QR Code button.
- Use the verifier testing device to scan the QR code displayed on the wallet testing device.
- Use the wallet testing device to consent to sharing the information with the verifier.
- Use the verifier testing device and select the View response button.
You should see a result similar to the following:
- The verifier app user adds a new certificate to the app. This is the certificate associated with the issuer of the mDoc we are about to verify.
- The wallet app user creates a QR code to initiate the proximity presentation workflow.
- The verifier app scans the QR code, establishes a secure connection and sends a presentation request.
- The wallet app user reviews the presentation request and agrees to share matching mDocs with the verifier.
- The verifier app receives the mDocs included in the presentation response.
- The verifier app user views the verification results.
Congratulations! Your verifier application can now verify mDocs presented via a proximity presentation workflow, as per ISO 18013-5.
Summary
You have just used the iOS mDoc verifier SDK to build an iOS application that can verify an mDoc presented via a proximity workflow as per ISO 18013-5:
This was achieved by building the following capabilities into the application:
- Initialise the SDK, so that your application can use its functions and classes.
- Manage certificates, which enable your application to verify mDocs that were issued by trusted issuers.
- Scan a QR code presented by a wallet application and establish a secure communication channel.
- Send presentation requests to the wallet application, receive a presentation response and verify its content.
- Display the results to the verifier app user.
What’s next?
- You can check out the iOS mDoc verifier SDK Docs to learn more about available functions and classes.