Learn how to build an iOS application that can claim an mDoc via OID4VCI
Introduction
In this tutorial we will use the iOS mDoc holder SDK to build an iOS wallet application that can claim an mDoc issued via an OID4VCI workflow:

- The user launches the wallet application and scans a QR code received from an issuer.
- The wallet displays what credential is being offered to the user and by what issuer.
- The user agrees to claiming the offered credentials.
- The user is redirected to complete authentication.
- Upon successful authentication, the credential is issued to the user’s wallet application, where they can now view it.
The result will look something like this:
Prerequisites
Before we get started, let’s make sure you have everything you need.
Prior knowledge
-
The issuance workflow described in this tutorial is based on the OID4VCI specification. If you are unfamiliar with this specification, refer to our Docs section for more information:
- What is credential issuance?
- Breakdown of the OID4VCI workflow.
- What are mDocs?
-
We assume you have experience developing iOS native apps in Swift.
If you need to get a holding solution up and running quickly with minimal development resources and in-house domain expertise, talk to us about our white-label MATTR GO Hold app which might be a good fit for you.
Assets
- As part of your onboarding process you should have been provided with access to the following
assets:
- ZIP file which includes the required framework:
(
MobileCredentialHolderSDK-*version*.xcframework.zip). - Sample Wallet app: You can use this app for reference as we work through this tutorial.
- ZIP file which includes the required framework:
(
Development environment
- Xcode setup with either:
- Local build settings if you are developing locally.
- iOS developer account if you intend to publish your app.
Testing device
- Supported iOS device to run the built application on, setup with:
- Biometric authentication (Face ID, Touch ID).
- Bluetooth access and Bluetooth turned on.
- Available internet connection.
Got everything? Let’s get going!
Environment setup
Perform the following steps to setup and configure your development environment:
Create a new project
Please follow the detailed instructions to Create a new Xcode project and add your organisation’s identifier.

Unzip the dependencies file
- Unzip the
MobileCredentialHolderSDK-*version*.xcframework.zipfile. - Drag the
MobileCredentialHolderSDK-*version*.xcframeworkfolder into your project. - Configure
MobileCredentialHolderSDK.xcframeworkto Embed & sign.
See Add existing files and folders for detailed instructions.
This should result in the the following framework being added to your project:

Configure required resources
-
Create a new file named
Constants.swiftwithin your project. -
Add the following string resources to represent the Authentication provider we will use for this tutorial:
Swiftenum Constants { static let redirectUri: String = "io.mattrlabs.sample.mobilecredentialholderapp://credentials/callback" static let clientId: String = "ios-sample-mobile-credential-holder-app" }redirectUri: This is the path the SDK will redirect to once the user completes Authentication with the issuer. Our best practice recommendation is to configure this to be{redirect.scheme}://credentials/callbackas shown in the example above. However, it can be any path as long as it is handled by your application and registered with the issuer against the correspondingclientId.clientId: This is the identifier that is used by the issuer to recognise the wallet application. This is only used internally in the interaction between the wallet and the issuer and can be any string as long as it is registered with the issuer as a trusted wallet application.
Both of these parameters must be registered with the issuer as a key pair. For this tutorial
you will be claiming a credential from a MATTR Labs tenant which is configured with the
redirectUri and clientId shown in the example above. We will help you configure your unique
values as you move your implementation into production.
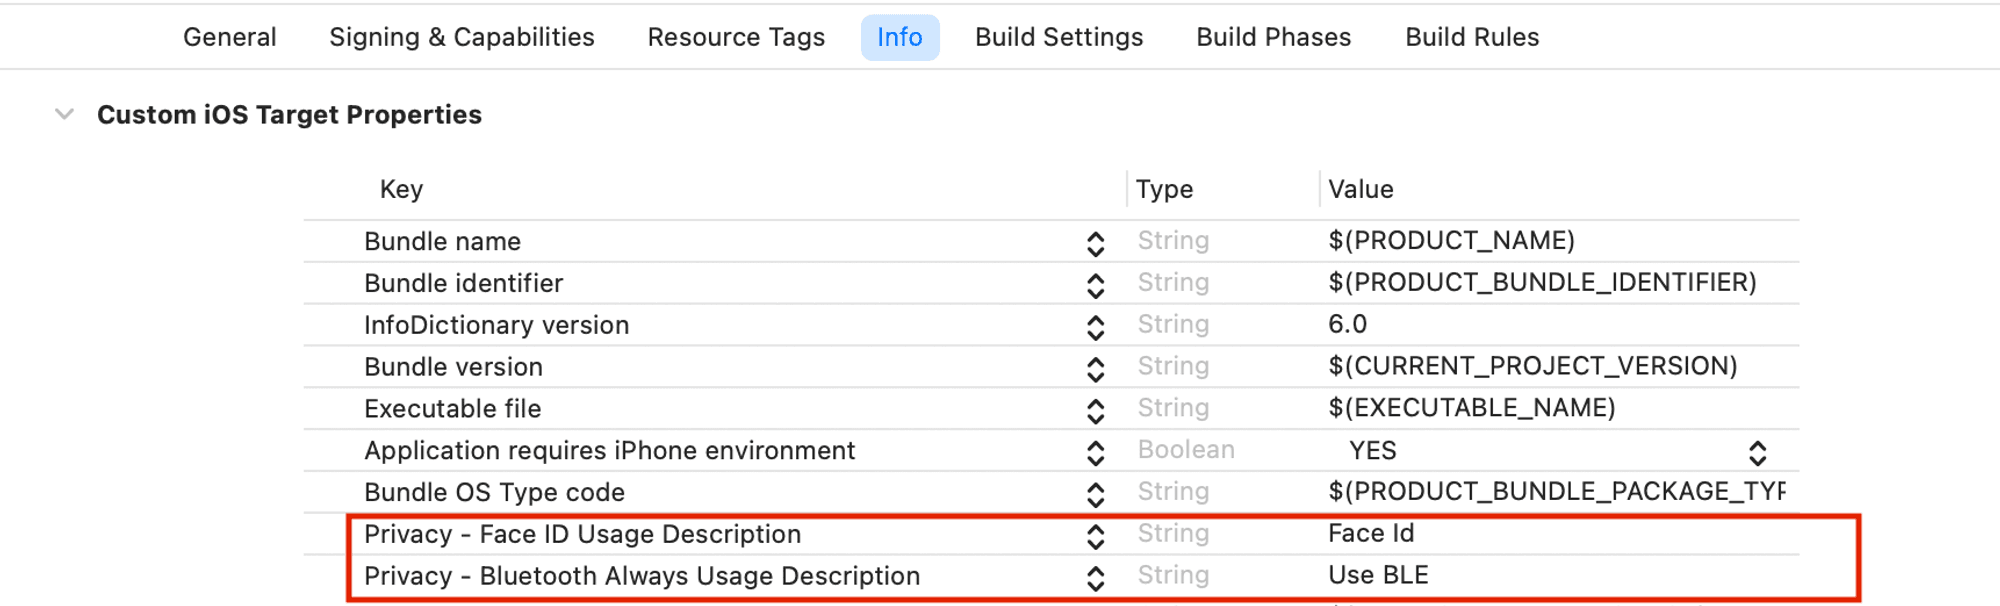
Add Bluetooth and biometric permissions
The SDK requires access to the mobile device Bluetooth and biometric capabilities for the different
workflows built in this tutorial.
Configure these permissions in the Info
tab of the Application target:
Run the application
Select Run and make sure the application launches with a “Hello, world!” text in the middle of the display, as shown in the following image:
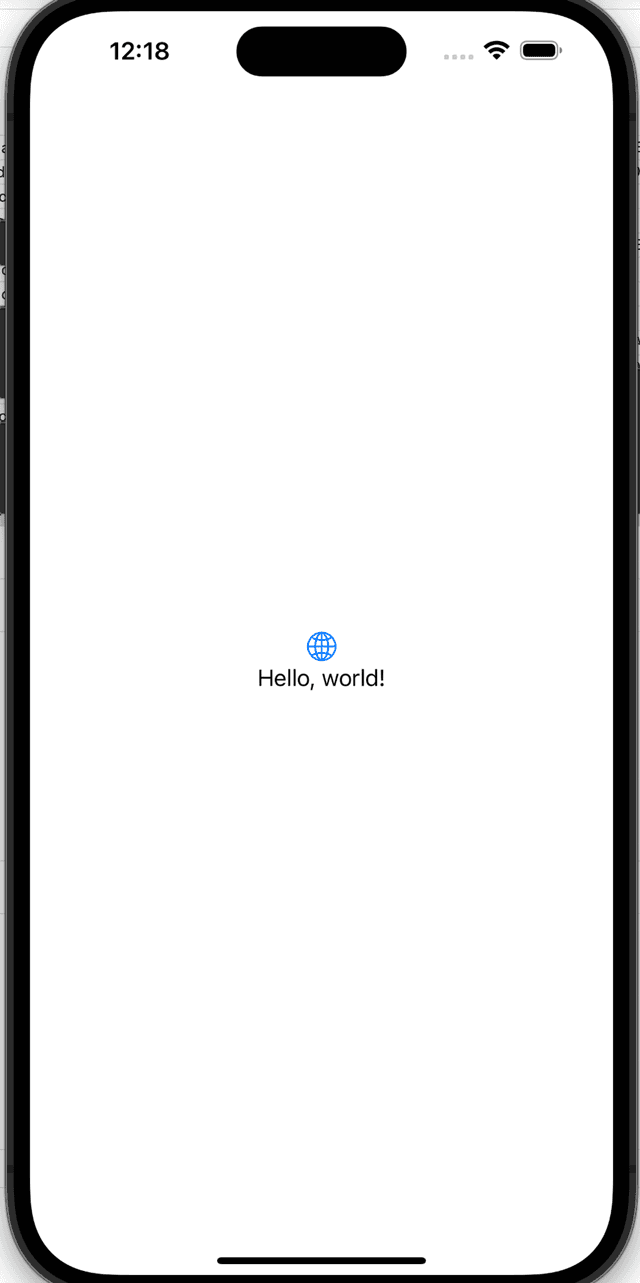
Nice work, your application is now all set to begin using the SDK!
Claiming a credential
In this part of the tutorial you will build the capabilities for a wallet application user to interact with an OID4VCI Credential offer and claim an mDoc.
To achieve this, we will break this capability down into the following steps:
- Initialise the SDK.
- Interact with a Credential offer.
- Retrieve offer details and present them to the Holder.
- Obtain user consent and initiate Credential issuance.
Initialise the SDK
The first capability you will build into your app is to initialise the SDK so that your app can use
SDK functions and classes. To achieve this, we need to import the MobilecredentialHolderSDK
framework and then initialise the MobileCredentialHolder class:
-
Open the
ContentViewclass in your new app project and replace any existing code with the following:Swiftimport SwiftUI import MobileCredentialHolderSDK struct ContentView: View { @ObservedObject var viewModel: ViewModel = ViewModel() // Step 2.5: QR scan button var body: some View { VStack { Text("Hello, world!") } .padding() } // Step 2.4: Create QRScannerView // Online Presentation Step 1.3: Create PresentCredentialsView } class ViewModel: ObservableObject { // Step 1.2: Add MobileCredentialHolder var // Step 3.1: Add DiscoveredCredentialOffer var // Step 4.1: Add retrieveCredentialResult var // Step 4.5: Add credential var init() { do { // Step 1.3: initialise MobileCredentialHolder SDK } catch { print(error.localizedDescription) } } // Step 3.2: Discover Credential Offer logic // Step 4.2: Retrieve Credential }
This will serve as the basic structure for your application. We will copy and paste different code snippets into specific locations in this codebase to achieve the different functionalities. These locations are indicated by comments that reference both the section and the step.
- Add the following code after the
// Step 1.2: Add MobileCredentialHolder varcomment to create a variable that holds themobileCredentialHolderinstance:
We recommend copying and pasting the comment text (e.g. // Step 1.2: Add MobileCredentialHolder var) to easily locate it in the code.
var mobileCredentialHolder: MobileCredentialHolder-
Add the following code after the
// Step 1.3: initialise MobileCredentialHolder SDKcomment to initialise the SDK by creating a new instance of theMobileCredentialHolderclass:SwiftmobileCredentialHolder = MobileCredentialHolder.shared try mobileCredentialHolder.initialise()This will initialise the SDK, making it available for your wallet application.
-
Run the app to make sure it compiles properly.
Interact with a Credential offer

Once the SDK is initialised, the next step is to build the capability to handle a Credential offer.
Wallet users can receive OID4VCI Credential offers as deep-links, QR codes or even app notifications. In this tutorial we will use the following QR code, which is a MATTR Labs example of an OID4VCI Credential offer:

Creating your own Credential offer is not within the scope of the current tutorial. If you’re interested, you can follow the OID4VCI guide that will walk you through creating one.
Your application must provide a way for the user to interact with Credential offers. As this tutorial uses an offer formatted as a QR code, your application needs to be able to scan and process it. For ease of implementation, we will use a third party framework to achieve this:
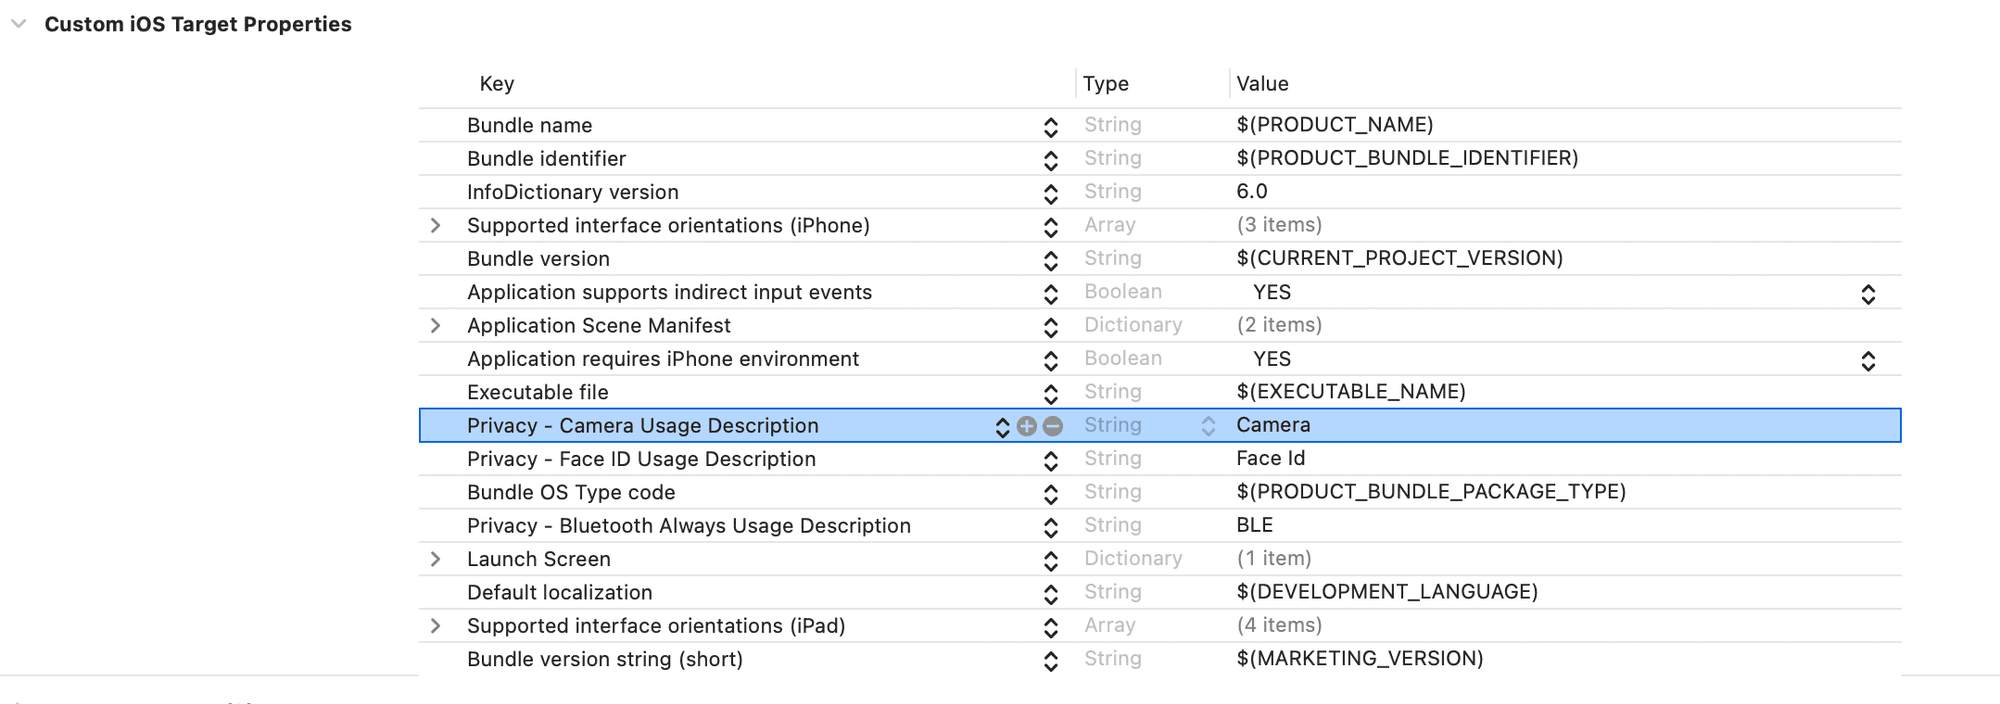
-
Add camera usage permissions to the app target:
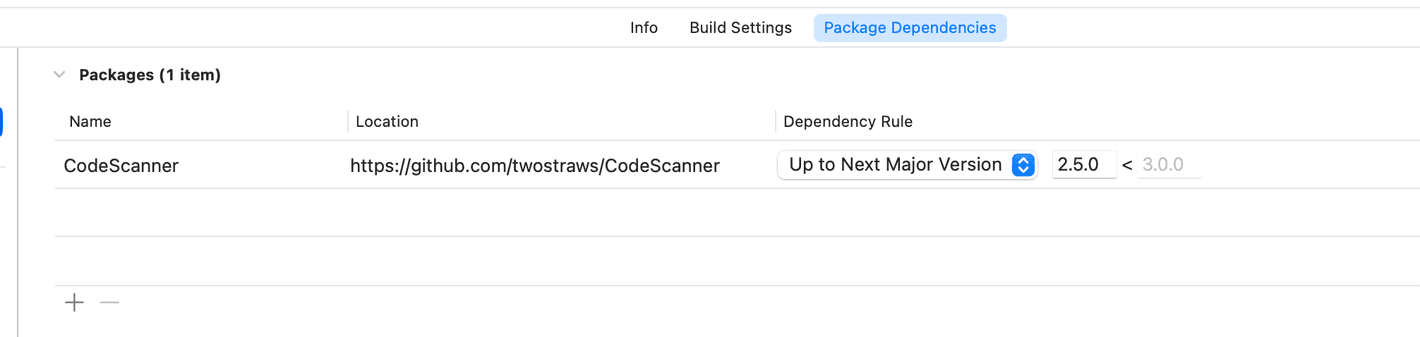
-
Add the CodeScanner library via Swift Package Manager.
-
Create a new swift file named
QRScannerViewand add the following code into it to implement the QR scanning capability:Swiftimport SwiftUI import CodeScanner struct QRScannerView: View { private let completionHandler: (String) -> Void init(completion: @escaping (String) -> Void) { completionHandler = completion } @Environment(\.presentationMode) var presentationMode: Binding<PresentationMode> var body: some View { CodeScannerView(codeTypes: [.qr]) { result in presentationMode.wrappedValue.dismiss() switch result { case .failure(let error): print(error.localizedDescription) case .success(let result): print(result.string) completionHandler(result.string) } } } } -
Return to the
ContentViewfile and add the following code under the// Step 2.4 Create QRScannerViewcomment to create a new view in the application for the QR scanning capability:Swiftvar codeScannerView: some View { QRScannerView( // Step 3.3 Update completion object completion: { _ in } ) } -
Replace the
var bodyobject under// Step 2.5: QR scan buttonwith the following code to create a new button to trigger the QR scanning functionality:Swiftvar body: some View { NavigationView { VStack { NavigationLink(destination: codeScannerView) { Text("Scan Credential Offer") } // Online Presentation Step 1.2: Add button to navigate to present credential view // Step 3.4: Display Credential Offer // Step 4.7: Display Retrieved Credential Spacer() } }.padding() }This will navigate to the app
QRScannerViewscreen when the user selects the Scan Credential Offer button, enabling them to use their device camera and scan a QR code. -
Run the app and select the Scan Credential Offer button.
As the user selects the Scan Credential Offer button, the app launches the device camera to enable the user to scan a QR code.
Retrieve offer details and present them to the user

The next capability to build is for the user to be able to review the Credential offer details before agreeing to claim any credentials. Credential discovery is the process in which a wallet application retrieves the offer details, including:
- What Issuer is offering the credentials?
- What credentials are being offered, in what format and what claims do they include?
To display this information to the user, your wallet application should call the
discoverCredentialOffer
function. We are going to implement this within the ViewModel class.
-
Add the following code under the
// Step 3.1: Add DiscoveredCredentialOffer varcomment to add a new variable that will hold the credential offer:Swift@Published var discoveredCredentialOffer: DiscoveredCredentialOffer? -
Add the following code under the
// Step 3.2: Add Discover Credential Offer logiccomment to define thediscoverCredentialOfferfunction that is called from within ourQRScannerViewcallback:Swiftfunc discoverCredentialOffer(_ offer: String) { Task { @MainActor in do { discoveredCredentialOffer = nil discoveredCredentialOffer = try await mobileCredentialHolder.discoverCredentialOffer(offer) } catch { } } } -
Replace the
completionobject under the// Step 3.3: Update completion objectcomment with the following code to handle the credential offer upon scanning a QR code:Swiftcompletion: { credentialOffer in viewModel.discoverCredentialOffer(credentialOffer) }Now, once the holder scans a QR Code that includes a credential offer, the
discoverCredentialOfferfunction is called and accepts the returnedcredentialOfferstring as itsofferparameter.This is a URL-encoded Credential offer which in our example was embedded in a QR code. In other implementations you might have to retrieve this parameter from a deep-link or an app notification.
The
discoverCredentialOfferfunction makes a request to theofferURL to retrieve the offer information and returns it as aDiscoveredCredentialOfferobject:Swiftstruct DiscoveredCredentialOffer { let issuer: URL let authorizeEndpoint: URL let tokenEndpoint: URL let credentialEndpoint: URL let credentials: [OfferedCredential] let mdocIacasUri: URL? }The wallet application can now use the
issuerandcredentialsproperties and present this information for the user to review. -
Add the following code under
// Step 3.4: Display Credential offerto achieve this:Swift// Step 4.4: Update if statement if viewModel.discoveredCredentialOffer != nil { let offer = viewModel.discoveredCredentialOffer! Text("Received \(offer.credentials.count) Credential Offer from \(offer.issuer)") List(offer.credentials, id: \.doctype) { credential in HStack { VStack { Text("name: \(credential.name ?? "")") Text("doctype: \(credential.doctype)") } Spacer() Text("No. of claims: \(credential.claims.count)") } } // Step 4.3: Add Agree and Retrieve Credential Button Button { } label: { Text("Consent and retrieve Credential(s)") } } -
Run the app, select the Scan Credential Offer button and scan the following QR code (also provided at the top of this tutorial):
You should see a result similar to the following:
As the user scans the QR code, the wallet displays the Credential offer details.
Obtain user consent and initiate credential issuance

The next (and final!) step is to build the capability for the user to accept the credential offer based on the displayed information. This should then trigger issuing the credential and storing it in the wallet.
In our example this is achieved by selecting a Consent and retrieve Credential(s) button. Once
the user provides their consent by selecting this button, your wallet application must call the
retrieveCredentials
function to trigger the credential issuance.
-
Add the following code under the
// Step 4.1: Add retrieveCredentialResult varcomment to add a new variable that will hold the result returned by theretrieveCredentialsfunction:Swift@Published var retrievedCredentialResults: [RetrieveCredentialResult]? -
Add the following code under the
// Step 4.2: Retrieve Credentialcomment to call theretrieveCredentialsfunction when the user selects the Consent and retrieve Credential(s) button:Swiftfunc retrieveCredential() { Task { @MainActor in do { retrievedCredentialResults = try await mobileCredentialHolder.retrieveCredentials( credentialOffer: discoveredCredentialOffer!, clientId: Constants.clientId, redirectUri: Constants.redirectUri, autoTrustMobileCredentialIaca: true) // Step 4.6: add getCredential function } catch { print(error.localizedDescription) } } } -
Update the
Buttonobject under the// Step 4.3 Add Agree and Retrieve Credential Buttoncomment with the following to update the action of the Consent and retrieve Credential(s) button:SwiftButton { viewModel.retrieveCredential() } label: { Text("Consent and retrieve Credential(s)") } -
Update the
ifstatement under the// Step 4.4: Update if statementcomment to the following:Swiftif viewModel.discoveredCredentialOffer != nil && viewModel.retrievedCredentialResults == nil
Let’s review where we got all the parameters’ values from:
credentialOffer: This is theDiscoveredCredentialOfferobject returned by thediscoverCredentialOfferfunction in step 3.clientId: This was configured when setting up your development environment. It is used by the issuer to identify the wallet application that is making a request to claim credentials.redirectUri: This was configured when setting up your development environment. It is used by the SDK to redirect the user back to a specific wallet application view after completing authentication.

Once the function is called, it will redirect the user to
authenticate
with the configured Authentication provider defined in the authorizeEndpoint element of the
DiscoveredCredentialOffer object.
Upon successful authentication, the user can proceed to complete the
OID4VCI workflow configured by the issuer. This workflow can
include different steps based on the issuer’s configuration, but eventually the user is redirected
to the configured redirectUri which should be handled by your wallet application.
As the user is redirected to redirectUri, the issuer sends the issued mDocs to your wallet
application. The SDK then processes the received credentials and validates them against the
18013-5 spec. Credentials who meet validation rules are
stored in the wallet application internal data storage.
The
retrieveCredentials
function then returns a
RetrieveCredentialResult
array, which references all retrieved credentials:
[RetrieveCredentialResult]

struct RetrieveCredentialResult {
    let doctype: String
    let credentialId: String?
    let error: RetrieveCredentialError?
}

[
   {
      "doctype":"org.iso.18013.5.1.mDL",
      "credentialId":"F52084CF-8270-4577-8EDD-23149639D985"
   }
]doctype: Identifies the credential type.credentialId: Unique identifier (UUID) of this credential.
Your wallet application can now retrieve specific credentials by calling the
getCredential
function with the credentialId of any of the retrieved credentials.
The
getCredential
function returns a
MobileCredentialResponse
object which includes the issued mDoc encoded as a base64 string, and your wallet application can
now introduce UI elements to enable the user to view the issued credential.
-
Add the following code under the
// Step 4.5: Create credential varcomment to create a new variable that will hold the retrieved credential:Swift@Published var credential: MobileCredential? -
Add the following code under the
// Step 4.6: add getCredential functioncomment to call thegetCredentialfunction and retrieve the first credential from theRetrieveCredentialResultarray:Swiftcredential = try await mobileCredentialHolder.getCredential(credentialId: retrievedCredentialResults![0].credentialId!) -
Add the following code under the
// Step 4.7: Display retrieved credentialcomment to display the retrieved credential to the user:Swiftif viewModel.credential != nil { let credential = viewModel.credential! VStack { Text("Retrieved Credential") Text("doctype: \(credential.docType)") Text("Credential info: \(String(describing: credential.claims!))") } } -
Run the app, select the Scan Credential Offer button, scan the QR code and then select Consent and retrieve Credential(s).
You should see a result similar to the following:
As the user scans the QR code, they are then provided with the offer details by the wallet. The user then provides consent to retrieving the credentials to which the wallet responds by initiating the issuance workflow and displaying the retrieved credentials to the user.
This demo MATTR Labs Credential offer doesn’t actually authenticate the user before issuing a credential. Instead of authentication the user is redirected to select the credential they wish to issue into their wallet. In production implementations this must be replaced by a proper authentication mechanism to comply with the OID4VCI specification.

Congratulations! Your wallet application can now interact with an OID4VCI Credential offer to claim mDocs!
Summary
You have just used the iOS mDoc holder SDK to build a wallet application that can claim an mDoc issued via an OID4VCI workflow:
This was achieved by building the following capabilities into the application:
- Initialise the SDK so the application can use its functions and classes.
- Interact with a Credential offer formatted as a QR code.
- Retrieve the offer details and present them to the user.
- Obtain user consent and initiate the credential issuance workflow.
What’s next?
- You can build the capability to preset the claimed credential for proximity verification.
- You can check out the iOS mDoc holder SDK Docs to learn more about available functions and classes.